8.6 Adding or changing text
The following toolbar buttons are used to insert text:
 Insert text – type the words that you want to be printed in the Content field
 Insert auto text – inserts the information from the cardholder’s record that corresponds to your selection from the System Text drop-down list
 Resize – resizes the text container to fit the text
 Toggle Sample Text – Changes auto text fields into sample text
8.6.1 Adding and changing static text
To add static text:
- Click Insert text.
- Type the text that you want to be displayed in the Content field. The text will wrap automatically in the box.
- Move your mouse over the text in the layout area and drag it to the correct position.
-
Resize the text area. Either:
- Place your mouse over the small box at the bottom right of the red border and drag the outline to the correct size.
-
Click the Resize button on the toolbar.
Note: This removes the wrapping and sets the text to a single line.
-
To change standard text:
- Click the existing text to select it.
- Enter the new text in the Content field.
8.6.2 Adding dynamic text
To add dynamic text:
- Click Insert auto text.
-
Select the information you want to be displayed in the System Text field.
In addition to the standard options, this list contains any fields that have been added to the Add Person workflow for your organization. The text wraps automatically in the box.
To supply a representative sample value for the dynamic text to help you design your layouts, type into the Sample Text field. In cases where the created layout has dense information, you can make the sample text appear as a small string regardless of content by setting it to the Minimalist Text value; you can select this text more easily in densely-populated layouts.
To toggle between the System Text value, the Sample Text value, and the Minimalist Text value, click the Toggle Sample Text button
 .
.Note: To view sample text in the print preview, select the print preview when the Sample Text mode is active.
- Move your mouse over the text in the layout area and drag it to the correct position.
-
Resize the text area. Either:
- Place your mouse over the small box at the bottom right of the red border and drag the outline to the correct size.
-
Click the Resize button on the toolbar.
Note: This removes the wrapping and sets the text to a single line.
-
To change dynamic text:
- Click the existing text to select it.
- Select a different option in the System Text field.
8.6.3 Custom text fields
You can add a custom text field that combines dynamic fields with plain text.
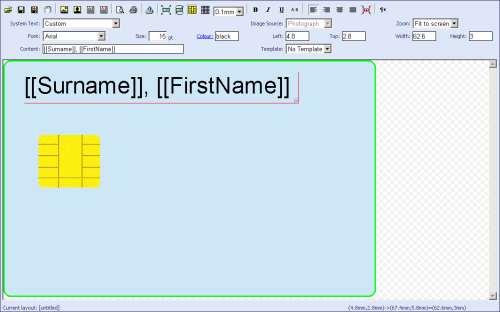
To find out what field codes are available, select the other entries in the System Text drop-down list and take a note of the codes you want to use. Field codes are enclosed in double square brackets ([[ ]]). You can then include one or more of these codes in a single field, and include plain text; for example:
[[Surname]], [[FirstName]]
This combines two name fields and puts a comma between them; for example:
Smith, John
Telephone: [[PhoneNumber]]
This combines plain text with the cardholder's telephone number; for example:
Telephone: 555-1234
To add a custom text field:
- From the Configuration category, select Card Layout Editor.
- On the toolbar, click Insert Auto Text.
- From the System Text drop-down list, select Custom.
-
In the Content box, type the codes for the fields you want to use along with any plain text.
Note: Field codes are case-sensitive.
